Tool Panels
SOLO mode provides a range of tools, including an editor, documentation, a browser, and more. You can use these tools to expand your capabilities.
Show the tool panel
After switching to SOLO mode, click the Show Tools icon in the upper-right corner of the interface or use the shortcut (macOS: `option + command + /`; Windows: `Ctrl + Alt + /`) to show the tool panel.
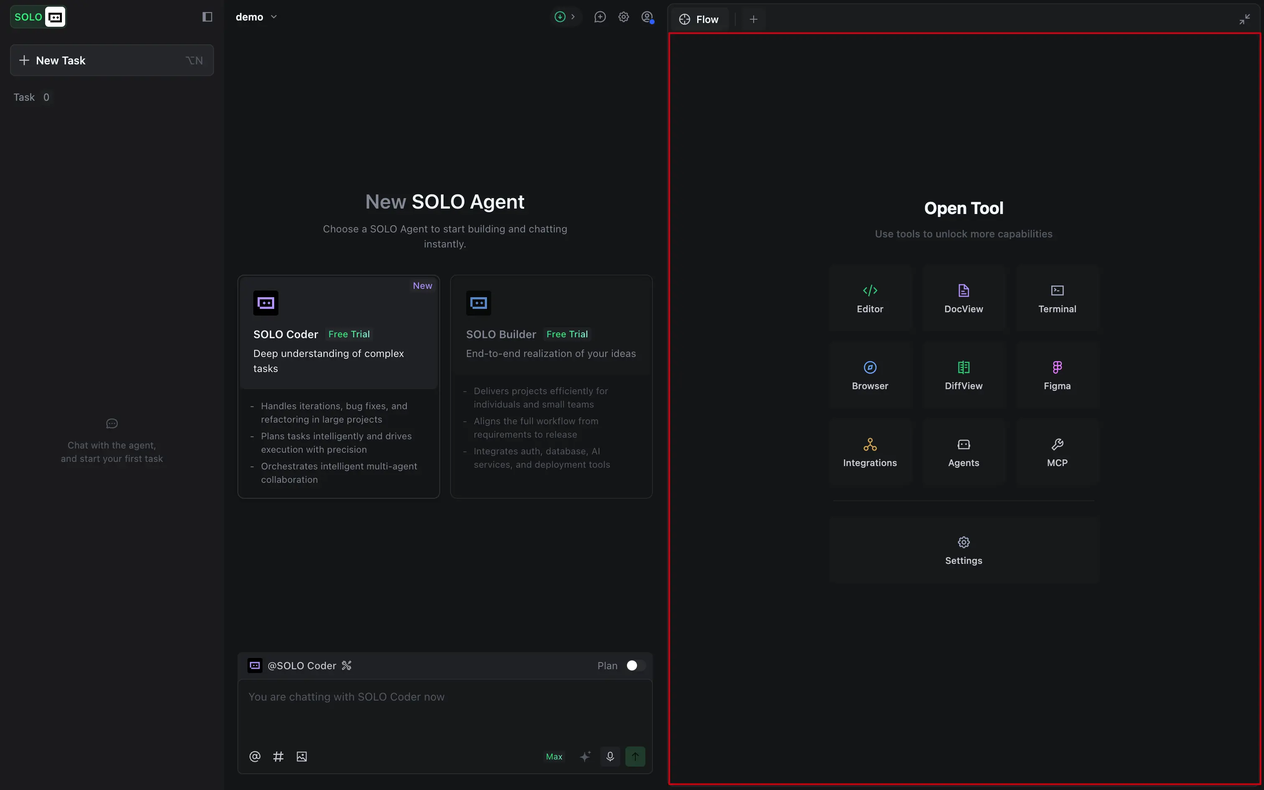
Available tools
During the process of analyzing and executing tasks in SOLO Builder or SOLO Coder, different tools play different roles.
| Tool | Description |
|---|---|
| Editor | Show the coding process and the final code. Once code generation is complete, it will be automatically accepted. You can click the View Diff button, and then view the change details in the DiffView tool. You can also manually edit code, or select code snippets and send them to AI chat for further processing. For operations such as deleting files or code, the agent will seek your confirmation in advance. |
| DocView | Present the generation process and initial drafts of documents related to development requirements (such as product requirement documents, technical architecture documents, and more). You can manually modify these documents, or select specific content and send it to AI for modification. Markdown format is supported. |
| Terminal | Display the process and result of command execution. You can select the command output and then click the Add to chat button to send it to chat to ask AI. If you encounter an error, you can also select the error message and send it to AI for analysis and processing. |
| Browser | Display the AI-built web application for you to preview.
|
| DiffView | Display the code changes for the current task, including the number of changed files, file names, the number of changed lines of code, and other information. You can open a file to view the specific changes. |
| Figma | To select the frame or element that needs to be converted into code and send it to AI chat. For more information, refer to "Figma to code" |
| Integration | Support the quick integration of various third-party services, including Supabase service, deployment service, AI service, and payment service. For more information, refer to "Supabase service", "Deployment service", "AI service", and "Payment service". Note: Integration services are only available for SOLO Builder. |
| Agent | For viewing built-in agents and managing custom agents. For more information, refer to "Agent". |
| MCP | For managing MCP servers. For more information, refer to "Model Context Protocol". |
| Settings | For configuring TRAE, including account settings, general settings, development environment settings, and more. |
Flow
You can enable or disable "Flow" mode by clicking the Flow button in the upper-left corner of the tool panel. When enabled, the system automatically switches tools based on the AI's current work stage and displays real-time progress and output.
For example, when the AI is generating a product requirement document based on your instructions, the system automatically opens the DocView tool to show the document generation process. When the AI starts coding, it switches to the Editor tool to display the coding process.
During task execution, the tools are read-only, and manual operations are not allowed. If you double-click or scroll within the tool, the system will exit "Flow" mode.
If you need to manually intervene or edit content, turn off "Flow" mode first.
NoteIf the AI is processing multiple tasks simultaneously, the "Flow" mode applies only to the current task and does not carry over across tasks.